Overview
For this project we used a lot of parts and components that are not necessarily required… We chose to demonstrate the flexibility and fun factor of USB peripherals as well as make a very feature-rich system. The products we chose are not only usable in a scooter, but also (and more practically) in other automotive applications where GPS enabled systems are already commonplace.
![001[1]](https://www.thoughtlab.com/wp-content/uploads/2008/08/0011.2.jpg)
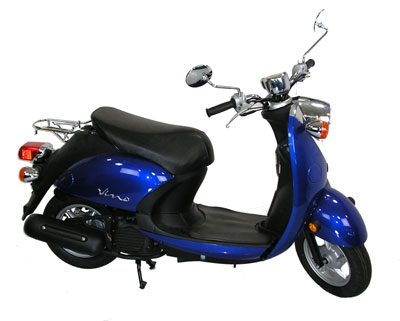
Scooter
We selected the Yamaha Vino Classic 2007 Scooter because we had access to one and liked the large amount of storage under the seat. Ultimately, any scooter could be used for this project, but there are obviously other possible challenges that we haven’t addressed here due to the large number choices out there. We were pleasantly surprised with the ease of modification and disassembly of the Vino.
![002[1]](https://www.thoughtlab.com/wp-content/uploads/2008/08/0021.jpg)
Motherboard
We chose the VIA EPIA MII12000 Mini-ITX Main board with fan for several reasons. The primary decision was based on its cool running operation and small form factor. Some other nice features are: plenty of USB ports, an onboard PCMCIA card slot (great for cell-based bandwidth) and an onboard compact flashcard slot to economically add solid-state storage.
![003[1]](https://www.thoughtlab.com/wp-content/uploads/2008/08/0031.jpg)
Monitor
The monitor used is the Innovatek IN-007VT 7 VGA LCD monitor with USB Touch Screen Panel. This monitor provides a very user-friendly, touch-based interface with an onscreen keyboard app that can facilitate a lot of flexibility in a single device. The monitor runs natively on 12V DC and is designed to work well with the “dirty power” found in most vehicles. Finally the monitor is easily removed with the quick-release mount and input cords, allowing a way to secure it safely in the storage compartment of the scooter when not in use.
![004[1]](https://www.thoughtlab.com/wp-content/uploads/2008/08/0041.jpg)
Solid State Drive
We chose 2 different solid state drives for this system. The first is a plug-on 40 pin solution at a 2 gig capacity. At the time of our purchase it cost quite a bit but Emphase now offers up to 8 gig solutions and very affordable 4 gig solutions. These 40 pin solid-state drives are perfect for the boot media of this system and perform very well. The second solid-state device is a simple compact flash card with 32 gig capacity, which simply plugs into the motherboard’s add-on bays.
![005[1]](https://www.thoughtlab.com/wp-content/uploads/2008/08/0051.jpg)
Ram
When we chose our single 1 gig stick of low profile ram we were originally planning to use a case that required it. Low profile ram generally costs double standard ram and is only useful in a super tight enclosed chassis. Because we decided (after buying the low profile ram) to create our own chassis from scratch, we could have gone with standard ram to save some dough. With memory costs so low we would recommend two 1 gig sticks of ram, if using a motherboard that can support it.
![006[1]](https://www.thoughtlab.com/wp-content/uploads/2008/08/0061.jpg)
Web Cam
The Logitech QuickCam® Pro 5000 Webcam was selected for the combined high native frame rate and resolution for the price. We actually had this camera on-hand from a previous project and knew it would work well for our needs. This camera also works great as a backup camera in automotive projects.
![007[1]](https://www.thoughtlab.com/wp-content/uploads/2008/08/0071.jpg)
Access Point
When we selected the access point for this system we wanted a popular, hackable product, but it needed to offer a base feature set for people who don’t want to hack hardware. The LINKSYS WRT54GL Wireless-G Broadband Router was the right choice for this project. One nice thing that is worth noting about this router is that it is 12V native, so it can be plugged directly into the power system for the brain without modification.
![008[1]](https://www.thoughtlab.com/wp-content/uploads/2008/08/0081.jpg)
GPS
Originally we chose to use the USGlobalSat BU-353 WaterProof USB GPS Receiver but then found the Garmin GPS 18 USB USB GPS and swooned despite the increase in cost. We really like how the Garmin system has the fastest cold acquisition time, and the ability to connect to the most satellites simultaneously. Their deluxe packages also include some nice turn-by-turn mapping software that works well with this system.
![009[1]](https://www.thoughtlab.com/wp-content/uploads/2008/08/0091.jpg)
Keyboard
The keyboard was really selected for its geek factor and super-small form. The onscreen keyboard makes more sense in most situations, however if you needed to write an email on the road, for instance, it’s far easier to use the little laser projector keyboard.
![010[1]](https://www.thoughtlab.com/wp-content/uploads/2008/08/0101.jpg)
System Monitor
The system monitor turned out to be a great feature. It has the capability of displaying anything from email, system usage and temperatures, to eBay auctions and streaming IRC. It is just too cool to pass up for the price.
![011[1]](https://www.thoughtlab.com/wp-content/uploads/2008/08/0111.jpg)
Guitar Interface
Another great “for the hell of it” USB feature. The electric guitar jam lab offers the ability to connect a guitar directly to the computer and mix up the sounds on demand. This gives the freedom for driving somewhere and recording/streaming a live performance.
![012[1]](https://www.thoughtlab.com/wp-content/uploads/2008/08/0121.jpg)
TV Tuner / PVR
Still another fun, unnecessary feature for bumping the geek points to a new level, the SABRENT USB 2.0 TV Tuner/Video Capture, offers TV tuner features, FM radio and PVR features. While it’s possible this has been discontinued, any good USB tuner/PVR system should work well.
![013[1]](https://www.thoughtlab.com/wp-content/uploads/2008/08/0131.jpg)
Wireless Device
Our favorite piece on this project is the run of the mill 802.11 Wi-Fi device connected to the huge antenna on the back of the scooter. This gives the ability to achieve maximum range while war driving. We used the ZyXEL AG-200 USB device but found it was finicky to get working well with network stumbler. If the intention is to do any serious war driving we suggest choosing a Wi-Fi device based on the compatible network stumbler devices on the device’s website.
![014[1]](https://www.thoughtlab.com/wp-content/uploads/2008/08/0141.jpg)
FM Transmitter
The FM transmitter is another geek factor toy we had to have (is there a theme developing?). We felt the idea of a pirate radio station on the road was too fun to pass up. While the small version of the transmitter we used/hacked is mostly legal, there is the option of going really big with a transmitter from ramsey electronics. This larger option may not be legal in some configurations.
![015[1]](https://www.thoughtlab.com/wp-content/uploads/2008/08/0151.jpg)
Blue tooth headset
We utilized the Bluetooth for both the headset and the laser keyboard. We used a generic Bluetooth adapter from AirNet but have seen that the D-link DBT-120 Bluetooth adapter has been getting rave reviews.
![016[1]](https://www.thoughtlab.com/wp-content/uploads/2008/08/0161.jpg)
Blue tooth headset
We opted to use one of Plantronic's Bluetooth headsets to provide both the audio and the VOX support (for live chat or Skype phone calls on the road). Another tantalizing feature that’s been getting a lot of traction lately is voice command and dictation software. One Voice has a very nice product offering.
![017[1]](https://www.thoughtlab.com/wp-content/uploads/2008/08/0171.jpg)
USB Hub
We used the low profile Sabrent SBT-U2HA USB hub but later found the USB Squid and fell in love with it for this application.
![018[1]](https://www.thoughtlab.com/wp-content/uploads/2008/08/0181.jpg)
TV / FM Antenna
These great little antennas by Innovatek work great for the PVR’s TV and FM tuner. We mounted them inside the body panels of the scooter to turn them into stealth antennas. Due to the extreme cable length we had to do a little cutting, splicing, soldering and heat shrinking to remove the unnecessary bulk.
![030[1]](https://www.thoughtlab.com/wp-content/uploads/2008/08/0301.jpg)
Main Antenna
When it comes to blasting signal strength there are a lot of antenna options. We used a 30 DB antenna; however there are possible legal issues from the FCC if the implementation isn’t done carefully. Hyper link tech has a very nice selection of 2.4 GHz antennas that are super easy to work with.
![019[1]](https://www.thoughtlab.com/wp-content/uploads/2008/08/0191.jpg)
Antenna Cables
To connect to various devices, including the large war driving antenna, we had to use various premade pigtails. Hyper Link Tech offers a very comprehensive selection for any need. Depending on the equipment used, custom cables are probably needed. Ordering these cables pre-made can save a lot of time but not necessarily a lot of money.
![021[1]](https://www.thoughtlab.com/wp-content/uploads/2008/08/0211.jpg)
Power Supply
Logic Systems offers a wide selection of automotive computer power supplies that are extremely rugged and easy to use. We chose the 160 Watt DC-DC automotive power supply. It offers good device support, and the ability to handle noisy power. They offer lower wattage power supplies that may extend runtime when the engine is off.
![025[1]](https://www.thoughtlab.com/wp-content/uploads/2008/08/0251.jpg)
802.11 Antenna Extender
The Linksys AS2TNC is a fairly straight forward device acting as an extension cable for the antennas. The bonus is that it is cheap and reduces the need for custom cutting and splicing of the cables.
![026[1]](https://www.thoughtlab.com/wp-content/uploads/2008/08/0261.jpg)
FM Transmitter Antenna
We felt that our little pir8 radio station needed a little more range than the ten feet the stock fm transmitter offered. We mounted and connected a basic automotive FM antenna to the transmitter to do the job. There are many options, from basic static models to retractable types, and all are at very affordable prices. We used a universal antenna from the Crutchfield site.
![028[1]](https://www.thoughtlab.com/wp-content/uploads/2008/08/0281.jpg)
Other Consumables
Other typical consumables we used include: crimp-on wire disconnects, fuse busses, inline fuses, aluminum stock, wire, and glue. A unique build may necessitate some custom fabrication and problem solving we can’t predict… so good luck, have fun, and be safe!
